
Create Kubernetes federated clusters on AWS
AWS recently introduced their new solution to orchestrate Federated EKS Clusters. The solution is based on kubefed and deploys an infrastructure with a bastion cluster to operate the clusters and two EKS clusters in different regions. You can now have highly available EKS setup bootstrapped using a CloudFormation template in less than an hour.
But first, what is kubefed ?
Kubefed (for “Kubernetes Cluster Federation”) allows to orchestrate multiple Kubernetes Cluster
by exposing a high-level control pane. Your kubernetes clusters can join the federation cluster
allowing you to create Federated CRDs.
Kubefed repository: https://github.com/kubernetes-sigs/kubefed
By doing so, you can create distributed deployments accross multiple clusters
and even share resources such as ConfigMap or Secret.
Using Amazon’s Federated EKS, we will setup a kubefedctl bastion and provision two
EKS Clusters using eksctl to create a multi-region federated Kubernetes cluster.
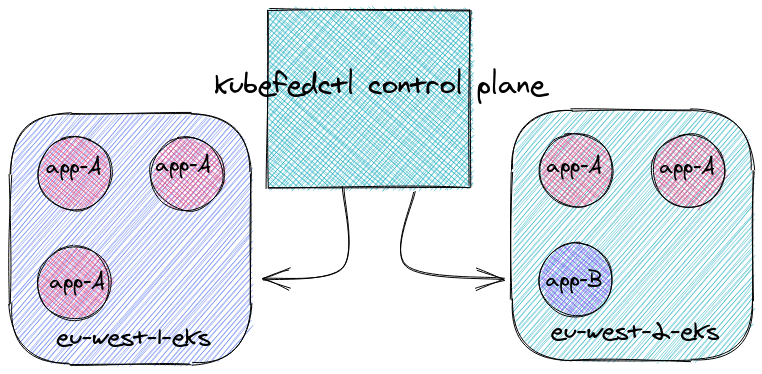 kubefed-based clusters concept
what is Federated Amazon EKS ?
The Federated Amazon EKS is a solution aiming to facilitate the deployment of a kubefed-based multi-cluster infrastructure, using CloudFormation templates. The template provides a way of creating a bastion host that will act as the kubefed control plane.
This bastion will be bootrstrapped with all the necessary utilities, such as:
eksfedctlfor federation administrationeksctlfor cluster configurationkubectlpre-configured to be used in the federation cluster context
Implementation guide: federated-amazon-eks-clusters-on-aws
In order to setup a Federated Amazon EKS cluster, we will do the following:
- Apply the bastion host CloudFormation template
- Run
eksfedctlto create EKS clusters in the appropriate regions - Ensure the federated EKS clusters are properly setup
The eksfedctl utility will automatically provision the required infrastructure, VPCs, subnets and setup VPC peering between the bastion host’s VPC and the EKS Clusters’ VPCs.
 Federated Amazon EKS Cluster architecture - © Credits AWS
let’s try it out
Pre-requisite: Make sure you have the sufficient permissions to create the resources mentioned above. A user policy example is available in the awslabs/federated-amazon-eks-clusters repository.
provision the bastion template
The CloudFormation template for the bastion is pretty straight-forward. Beside the region, there is no need to configure much, except some extra tags or the default bastion’s instance type. The template is available at the following address:
federated-amazon-eks-clusters-on-aws.template
The default template’s bastion is a t3.micro instance which will be used to provision
the EKS clusters.
setup your federated EKS clusters
Once the bastion is up and running, we can access it and provision our clusters.
$ tmux  # the eksfedctl executable requires to be run
$ eksfedctl create --regions us-east-1 us-east-2
eksfedctl will take care of:
- Creating the VPC, the subnets, peering the VPCs together
- Creating the EKS Cluster, provisioning the instances, scaling groups
- Configuring the EKS Clusters to join the federated cluster
This might take a while, as it involves quite a few operations. Each child CloudFormation stack is available in its own region.
Upon succesful termination of the eksfedctl command, we can observe our
freshly created clusters by running:
$ kubectl -n kube-federation-system get kubefedclusters
NAME              AGE   READY
federated-eks-1   3s   True
federated-eks-2   1s   True
using the federated clusters
We can now try out kubefed’s features, by setting a NameSpace as federated.
$ kubectl create ns federate-me
namespace/federate-me created
$ kubefedctl federate ns federate-me
I0121 13:36:23.823163     843 federate.go:472] Resource to federate is a namespace. Given namespace will itself be the container for the federated namespace
I0121 13:36:23.837406     843 federate.go:501] Successfully created FederatedNamespace "federate-me/federate-me" from Namespace
Kubefed also provides the ability to propagate specific resources:
$ kubectl create cm -n federate-me my-cm --from-literal=data=bob
configmap/my-cm created
$ kubefedctl -n federate-me federate configmap my-cm
I0121 13:41:12.032669     878 federate.go:501] Successfully created FederatedConfigMap "federate-me/my-cm" from ConfigMap
When using the federate verb, kubefed create a FederatedResource (such as a FederatedConfigMap)
and begins propagating the resource to the federated clusters.
Describing the FederatedResource allows visualising the propagation state:
Name:         data-cm
Namespace:    federate-me
Labels:       <none>
Annotations:  <none>
API Version:  types.kubefed.io/v1beta1
Kind:         FederatedConfigMap
Metadata: # ...
Spec:
  Placement:
    Cluster Selector:
      Match Labels:
  Template:
    Data:
      Data:  bob
Status:
  Clusters:
    Name:  federated-eks-2
    Name:  federated-eks-1
  Conditions:
    Last Transition Time:  2021-01-21T14:00:02Z
    Last Update Time:      2021-01-21T14:00:02Z
    Status:                True
    Type:                  Propagation
  Observed Generation:     1
Events:
  Type     Reason                 Age   From                           Message
  ----     ------                 ----  ----                           -------
  Normal   CreateInCluster        25m   federatedconfigmap-controller  Creating ConfigMap "federate-me/data-cm" in cluster "federated-eks-1"
  Normal   CreateInCluster        25m   federatedconfigmap-controller  Creating ConfigMap "federate-me/data-cm" in cluster "federated-eks-2"
  Warning  CreateInClusterFailed  25m   federatedconfigmap-controller  Failed to create ConfigMap "federate-me/data-cm" in cluster "federated-eks-1": An update will be attempted instead of a creation due to an existing resource
example output from a federated resource description
As previously mentionned, federated clusters go way beyond “simply” sharing configs and secrets.
This setup allows you to leverage the power ReplicaSchedulingPreference by targeting
FederatedDeployments and applying weight to different clusters, but also
Multi-Cluster Ingress DNS and Multi-Cluster Service DNS.
deploying an application
We will deploy a Hello World application using our freshly created Federated cluster.
A Deployment is registered under the default API-group, therefore the FederatedDeployment
is available without further configuration.
---
apiVersion: types.kubefed.io/v1beta1
kind: FederatedDeployment
metadata:
  name: test-hello-world
  namespace: federate-me
spec:
  template:
    metadata:
      labels:
        app: hello-world
    spec:
      replicas: 3
      selector:
        matchLabels:
          app: hello-world
      template:
        metadata:
          labels:
            app: hello-world
        spec:
          tolerations:
            - effect: NoExecute
              key: node.kubernetes.io/unreachable
              operator: Exists
              tolerationSeconds: 30
            - effect: NoExecute
              key: node.kubernetes.io/not-ready
              operator: Exists
              tolerationSeconds: 30
          containers:
            - image: particule/helloworld
              name: helloworld
  placement:
    clusterSelector: {}
Deploy a hello-world application using FederatedDeployment
This FederatedDeployment will create a Deployment with a single container
named helloworld based on the image particule/helloworld. The 3 replicas
requested will be split amongst the two registered federated clusters. We can increase
the replica count accross the clusters using a ReplicaSchedulingPreference
with the same namespace/name as our FederatedDeployment and by setting
the .spec.totalReplicas count with the the new value of 7.
---
apiVersion: scheduling.kubefed.io/v1alpha1
kind: ReplicaSchedulingPreference
metadata:
  name: test-hello-world
  namespace: federate-me
spec:
  targetKind: FederatedDeployment
  totalReplicas: 7
  rebalance: true
Edit the number of replicas accross clusters
It might take a few moments to propagate the new deployment but after a while, the federated clusters will have the required number of replicas for our hello-world app.
$ kubectl get pods -lapp=hello-world -n federate-me -o wide --context=federated-eks-1
NAME                               READY   STATUS    RESTARTS   AGE     IP              NODE
test-hello-world-d6d58457b-bkbl5   1/1     Running   0          4m46s   172.21.79.120   ip-172-21-87-11.eu-west-1.compute.internal
test-hello-world-d6d58457b-mz9d5   1/1     Running   0          4m46s   172.21.86.18    ip-172-21-87-11.eu-west-1.compute.internal
test-hello-world-d6d58457b-ndfrr   1/1     Running   0          4m46s   172.21.90.117   ip-172-21-87-11.eu-west-1.compute.internal
$ kubectl get pods -lapp=hello-world -n federate-me -o wide --context=federated-eks-2
NAME                               READY   STATUS    RESTARTS   AGE     IP              NODE
test-hello-world-d6d58457b-5nwdt   1/1     Running   0          4m35s   172.22.91.188   ip-172-22-92-176.eu-west-2.compute.internal
test-hello-world-d6d58457b-fh59n   1/1     Running   0          4m35s   172.22.66.58    ip-172-22-92-176.eu-west-2.compute.internal
test-hello-world-d6d58457b-tqvvm   1/1     Running   0          4m35s   172.22.65.158   ip-172-22-92-176.eu-west-2.compute.internal
test-hello-world-d6d58457b-xh4x6   1/1     Running   0          105s    172.22.77.219   ip-172-22-92-176.eu-west-2.compute.internal
Example output from ReplicaSchedulingPreference with replicas=7
As for the Deployment resource kind, the Service resource does not require
any additional configuration to be configured using a FederatedService.
This will ensure that both our clusters can expose our applications through their own Service.
---
apiVersion: types.kubefed.io/v1beta1
kind: FederatedService
metadata:
  name: hello-world-svc
  namespace: federate-me
spec:
  template:
    spec:
      selector:
        app: hello-world
      type: NodePort
      ports:
        - name: http
          port: 80
  placement:
    clusters: {}
Create a FederatedService targeting app=hello-world
We can now try to access our app using the Service’s DNS in each cluster:
$ kubectl run -it -n federate-me --image=busybox svc-eks-1 --context=federated-eks-1 -- sh
/ # wget -O- -q hello-world-svc
<html>
  <head>
    <title>Hello world!</title>
    <!-- ... -->
  </head>
  <body>
    <img id="logo" src="logo.png" />
    <h1>Hello world!</h1>
    <h3>My hostname is test-hello-world-d6d58457b-bkbl5</h3>
    <h3>Links found</h3>
    <b>KUBERNETES</b> listening in 443 available at tcp://10.100.0.1:443<br />
  </body>
</html>
$ kubectl run -it -n federate-me --image=busybox svc-eks-2 --context=federated-eks-2 -- sh
/ # wget -O- -q hello-world-svc
<html>
  <head>
    <title>Hello world!</title>
    <!-- ... -->
  </head>
  <body>
    <img id="logo" src="logo.png" />
    <h1>Hello world!</h1>
    <h3>My hostname is test-hello-world-d6d58457b-fh59n</h3>
    <h3>Links found</h3>
    <b>KUBERNETES</b> listening in 443 available at tcp://10.100.0.1:443<br />
  </body>
</html>
Validate federated service in the federated clusters
deploying CRDs
Kubefed also can also federate custom resource definitions but requires some configuration. We will deploy the Prometheus-Operator (prometheus-operator/prometheus-operator) in our Federated Cluster and see which additional steps are involved.
$ wget -O archive.tar.gz https://github.com/prometheus-operator/prometheus-operator/archive/v0.45.0.tar.gz
$ tar xvf archive.tar.gz
$ kubectl apply -f prometheus-operator-0.45.0/bundle.yml --context=federated-eks-1
$ kubectl apply -f prometheus-operator-0.45.0/bundle.yml --context=federated-eks-2
Install Prometheus-Operator CRDs in both clusters.
We can now propagate Prometheus CRD by enabling it through kubefedctl and by patching the kubefed-role ClusterRole.
$ kubefedctl enable Prometheus --federated-group monitoring.coreos.com
customresourcedefinition.apiextensions.k8s.io/federatedprometheuses.monitoring.coreos.com created
federatedtypeconfig.core.kubefed.io/prometheuses.monitoring.coreos.com created in namespace kube-federation-system
Create and enable the FederatedPrometheus resource
$ kubectl patch clusterrole kubefed-role --type='json' -p='[{"op": "add", "path": "/rules/1", "value": {
            "apiGroups": [
                "monitoring.coreos.com"
            ],
            "resources": [
                "*"
            ],
            "verbs": [
                "get",
                "watch",
                "list",
                "update"
            ]
        }
}]'
clusterrole.rbac.authorization.k8s.io/kubefed-role patched
Allow the kubefed to federate resources from “monitoring.coreos.com”
Kubefed can now propagate the resources to both EKS clusters, as both of them have knowledge of the Prometheus-Operator CRDs and kubefed can observe them. To ensure everything is working as expected regarding CRD-federated resources, we create a simple Prometheus resource:
---
apiVersion: monitoring.coreos.com/v1
kind: Prometheus
metadata:
  name: prometheus
spec:
  serviceAccountName: prometheus
  resources:
    requests:
      memory: 400Mi
  enableAdminAPI: true
After registering the resource using kubectl apply we can federate the freshly created
Prometheus through the federated-eks-1 and observe propagation to the federated-eks-2.
$ kubefedctl -n federate-me federate prometheus prometheus
I0125 13:41:33.361770    4855 federate.go:501] Successfully created FederatedPrometheus "federate-me/prometheus" from Prometheus
$ kubectl get prometheus -n federate-me
NAME         VERSION   REPLICAS   AGE
prometheus                        80s
$ kubectl get prometheus -n federate-me --context=federated-eks-2
NAME         VERSION   REPLICAS   AGE
prometheus                        40s
$ kubectl get federatedprometheus -n federate-me
NAME         AGE
prometheus   26s
Ensure prometheus get replicated from kubefedctl federate
The FederatedPrometheus has been created through the federate command in the “federate-me”
namespace and a new Prometheus object appeared in the other cluster.
delete the clusters
When creating federated clusters using eksfedctl, an env file based on the stack name is created
in the home directory. This file facilitates the deletion of the EKS clusters provisionned earlier.
eksfedctl destroy -f ~/{stack name}.env
The bastion and the resources created using the CloudFormation template will remain, allowing to provision other federated EKS clusters easily.
Even if kubefed is still marked as in the “alpha” stage, AWS managed to ease
the creation and bootstrapping of High Availability Multi-Region EKS clusters.
We can hope that this will make the project graduate to the “beta” stage in the coming
times.
Theo “Bob” Massard, Cloud Native Engineer